
Sim racing is becoming increasingly popular and one of the most immersive ways to have a realistic racing experience is by adding more experience to your sim. As a sim racer, speaking for myself, you are always looking for more experience and perfection to make your sim experience even more realistic. This is highly addictive and fun! You can think about ambient lighting, bass shakers for extra vibration and, of course, adding a sim racing wind simulator.
With a wind sim, you get a pleasant breeze of (riding wind) cooling in the heat of the moment on the track 😉 Cool right? In this article, I will explain to you in simple steps how to make your own DIY wind sim for your sim rig! And believe me, with the right knowledge and tools, this is surprisingly easy!

What is a sim racing wind simulator?
Snel naar
Before we start building, we will first explain what a wind simulator is and what they are used for. Wind simulators are used by sim racers to create a super realistic and immersive racing experience by generating dynamic wind effects. This will take your gaming experience to an even higher level! Do you want this too? Then there are two options:
The quickest and easiest way is to buy a ready-made wind sim. Personally, I find these quite pricey and making your own is a lot more fun and something that gives you a lot of satisfaction. Between €250 and €450 euros, you have a plug-in wind sim that you can get started with right away. Examples are those of AlphaWindSim Whether the Hyperwind from EPLAB sim racing. Are you a handy DIYer? Then choose to make your own wind sim. How to do so is explained in the detailed step-by-step plan below.
Sim racing wind simulator requirements
Before we start building, we need parts. You can easily order these online. Do you have your own 3D printer? Fantastic! This makes making it a lot easier. If you don't have one, you will have to order these from a local print shop or opt for existing off-the-shelf solutions. I will include these in the list below. The list of supplies:
- 1x Arduino Uno rev3.
- 1x Motorshield v2 for Arduino Uno. Note: look carefully which model you buy. Not every model is suitable for driving motors.
- 1x USB Type A/B cable.
- 2x 120mm 4000 rpm pc fans 12v. View on Amazon or Aliexpress.
- 2x flexible universal car intake air tube. These are available in multiple colours. Order them at your local auto parts shop or online at Aliexpress or Amazon.
- 1x Power supply 12volt 3.4A.
- SimHub software. Download this software for free.
- Wind Sim parts (3D print) at AMstudio. For a small amount you support this project. Tip: check out the Wind Sim Mount from Treq.
- Optional: arduino case (3D print) to attach your arduino uno in for security.
Building your own DIY sim racing wind simulator
As with my previous project, the building your own button box, before building my own sim racing wind simulator, I took inspiration and followed the roadmap from AMstudio. In addition, Will Ford from Boosted Media also has a super clear video tutorial. In this article, I will take you step-by-step through how you can make your own DIY sim racing wind simulator.
Step 1: Attaching Arduino Uno and Motorshield
Let's kick it off simply. Carefully remove the Arduino Uno and the Motorshield from the packaging. Be careful not to damage the pins on the Motorshield, they bend and damage quickly. Then snap the Motorshield on top of the Arduino Uno. Done! On to step 2.
Step 2: Remove jumper and connect power adapter
Remove the jumper from the Motorshield. We no longer need this one as we are using power from the external power supply. The jumper is usually a yellow pin (1). The Arduino Uno uses power from the usb port connection.
Then cut off the connector at the end of the power supply. You will no longer need this one. Then strip the wires and connect them to the connector on the Motorshield (2). Look carefully which is positive and which is negative. If you connect these wrong, you will find that your Motorshield will go to Mars with a bang 😉 And that's a shame! I speak from experience 😛

Step 3: Build the wind sim mount and attach the PC fans
As I do not have a 3D printer, I opted to go for an existing solution: the Treq Wind Sim Mount. This is highly recommended! This set is affordable and immediately gives you all you need to mount the wind sim to your rig. The set is available in 120 and 140mm, depending on what size PC fan you have. The most common size is 120mm.

So am I purely positive? Well, no. The downside of this Treq Wind Sim Mount is that it is not ‘suitable’ for such a flexible air hose. In other words, the wind sim was not originally intended for connecting an air hose. So this did not fit and duck tape had to come into play here. Not a very nice solution, but functional. Fortunately, they have taken my feedback to heart and are working on a solution.

Update 1: Treq has listened to my feedback and let me know that they are working on custom diffusers so that this air hose does fit on the wind mount! Super cool. I will soon receive the first version of this and will update this post 🙂
Update 2: The new diffusers are in and will be included as standard from now on!
Follow Treq's instructions, or any other solution you chose, and use the screws to attach the pc fan to the wind sim mount. The end result will look like the one below!
Cut the connector from the fans. If all goes well, you now have two or three wires. Strip off the end and mark the positive and negative wire. You will need these to connect to the Motorshield.


Want to buy the Treq Wind Sim Mount? Then get now 5% discount (Also on other Treq products!) What do you need to do to get this? Follow me on Instagram (@staggingsimracing.dreamhosters.com), send me a DM and you'll receive the discount code from me 🙂 ...
Step 4: Connect the PC fans to the Motorshield
Now connect the positive and negative wires to motor 1 and motor 2. This is clearly marked on the motorshield and can hardly be missed. The module you have to connect the wires in consists of 5 connections: positive - negative - ground - negative - positive (from left to right). Channel or fan 1 is left, channel 2 is for the right fan.
I myself had some trouble figuring out which was the positive and negative wire. A digital multimeter or this article can help you with this.
All cables of the fans and the power supply are now connected. You are now done building your wind simulator! Fast forward to step 5 to configure SimHub.

Step 5: Attach the flexible air hose and mount your wind sim on your simulator
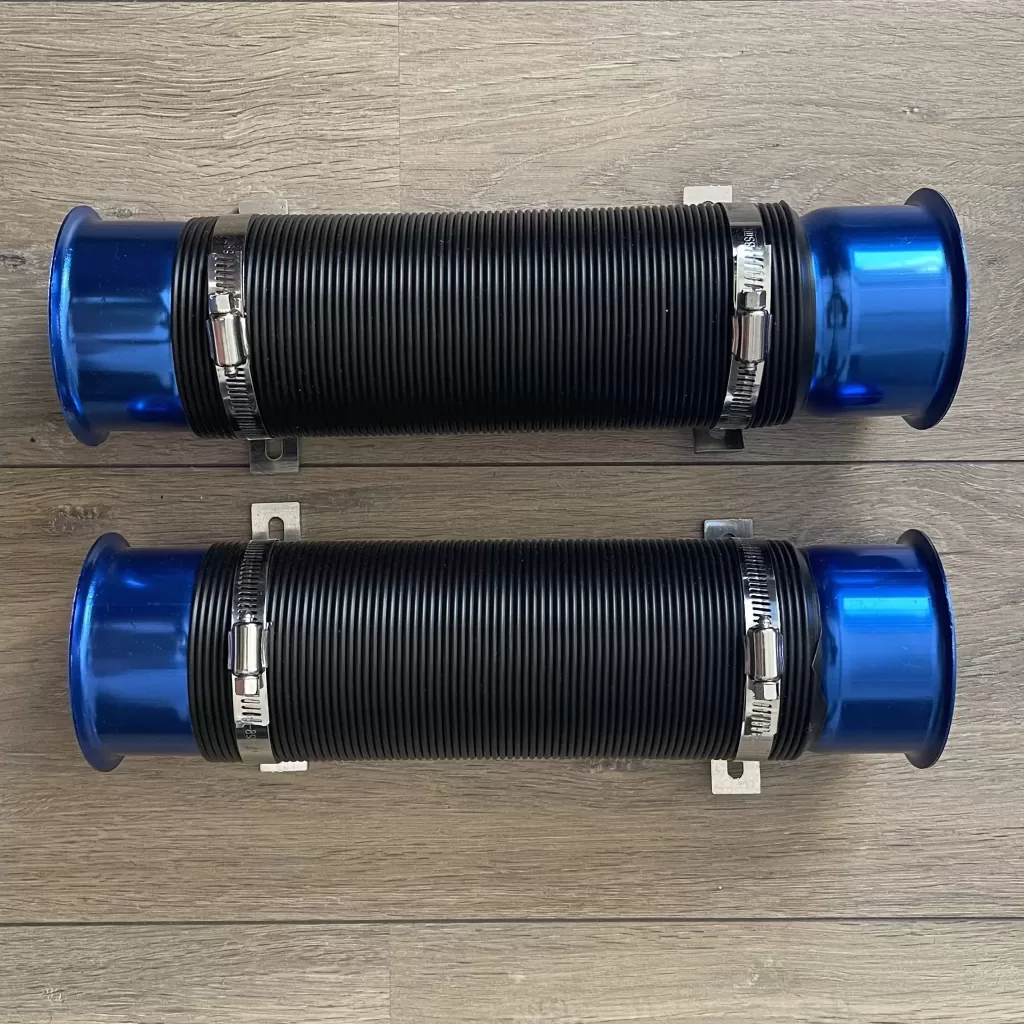
Grab your flexible car air hose, it looks like the one in the picture below. The standard diamater of these hoses is 76mm. The hoses are available in many colours. I personally chose the blue variant. This one matches my sim rig the best. Remove the coloured cap on one side of both hoses. You won't need this one anymore, but keep it well.
Then attach the air hose to the attachment made in step 3. You can already mount the wind sim on your sim rig. Where you want to mount it is up to you. In any case, make sure the air hose is aimed at your face. I myself placed it in the left and right corner, just below the wheelbase attachment. I attached the fans to my rig behind my triple screen setup.

Step 6: Connect the Arduino Uno to your PC and install and configure SimHub
Check once more that all the fans and the power supply are connected correctly. If this is the case then connect the Arduino Uno to your PC with the usb port and click the power supply plug into the socket. Now that all the hardware is connected, it's time to set up the software.
Download and install the programme SimHub. Once this programme is installed, open it and in the left menu, navigate to ‘Settings’ > ‘Plugins’ and find and select the ‘shake it’ plugin. Then go to ‘Arduino’ and click on ‘My Hardware’ in the navigation at the top.
Use the Setup Tool to configure your Arduino and Motorshield. Name your wind simulator, then scroll down and select the ‘Shake it Adafruit Motorshield v2’. Change the 0 to a 1 and set the PWM to 1600.
From the right-hand menu, select the correct Arduino Com Port and board type (Arduino Uno) and click ‘Upload to Arduino’. Wait for this process to complete and voilà, you have successfully configured your Arduino board.

Tip: Have you already connected several Arduino hardware to your PC? Then disconnect them for a while so as not to disturb the installation of your wind sim. This will prevent you from accidentally uploading the wrong sketch 🙂
Close the window and navigate to the ‘ShakeIt’ tab on the left side of the SimHub interface and turn the module Speed ‘on’. You can test and experiment with the settings, but for now I recommend keeping the default values. Click ’test’ to test if the fans start spinning.
Set the speed volume to 100%. Next, click on ‘Motors Output’ at the top and turn on the ‘Arduino Motors and fans’ toggle. Now scroll down to ‘Speed’ and turn on the channels you have your fans connected to. Is that motor 1 and 2? Then select channel 1 and 2. That's it! Now go to the last step 🙂

Step 7: Launch your favourite sim and enjoy!
Congratulations! You have now built your own DIY sim racing wind simulator 🙂 Quickly fire up your favourite game, hit the tarmac and enjoy this immense experience that makes your racing experience even more realistic and intense.
DIY Wind Sim video tutorial
Besides the step-by-step plan above, be sure to check out the video tutorials below from AMstudio and Boosted Media. They take you step-by-step through creating your diy wind sim.


Sim racing DIY
Want more DIY projects? Then check out the articles below:
- Make Your Own DIY Button Box In These 8 Simple Steps!
- Building a DIY Sim Racing Roof: This is how you do it! (9 Steps)
- Convert Your Old iPhone To A Sim Racing Dashboard
- DIY sim rig building? Here are the pros and cons!
Want to keep up to date with SimRacingHub content, news, DIY, tutorials, announcements and more? Follow us on Instagram @staggingsimracing.dreamhosters.com